Showing posts with label Binder Setup. Show all posts

Wednesday, July 1, 2015

OneBookJuly2015 | My Set Up


I'm so excited to take on the #OneBookJuly2015 challenge - I really need it this year!  As of late I've been on the planner merry-go-round, and getting tired of it.  My focus for this challenge will be to stick to one planner for the entire month, to quit flipping back and forth between the various styles of planners.  I really want to know if I can use a traveler's notebook for my main planner.  I'm also going to see if I can track my diabetes management in this book as well.  I've tried several times to incorporate this into my planner, but I've failed each time.  There's a lot of information that I need to track and having everything in one book would be ideal.

What I'm not changing for this challenge is my work planner set up.  That is completely separate and needs to stay that way for privacy reasons.  I'm also going to stick to journaling in a separate notebook.  I've done that for over 30 years and I don't want to change it now.  Finally, I'm going to keep my photo journal/smashbook/art journal (I can't figure out what to call it) separate as well since that system works for me too.

So I may not be following the rules exactly, but I still think the challenge will give me some valuable insight.

So on to the set up... since I know that's what you really came here to see ;)

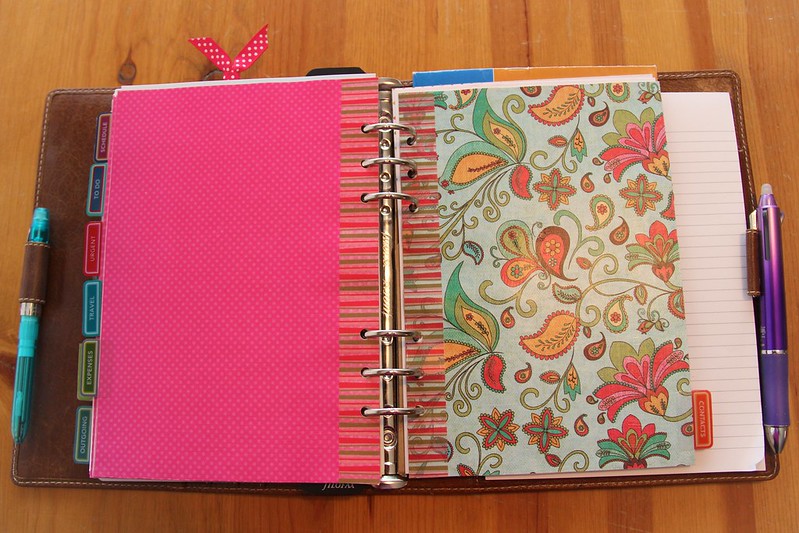
I'll be using my creme brûlée personal size traveler's notebook from ChicSparrow.  This notebook has four elastic bands.

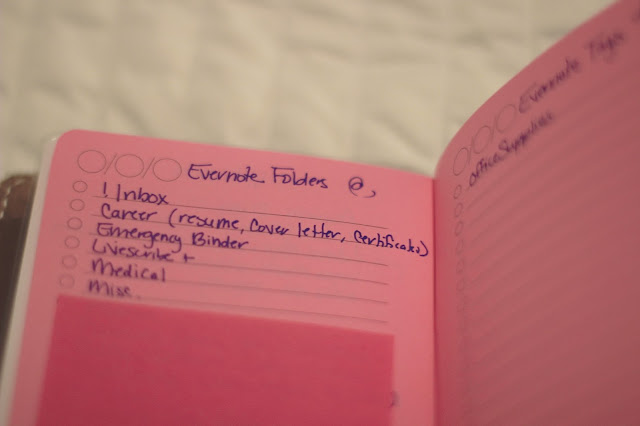
The first elastic houses my cover page, a zip pocket envelope with my personal/emergency info card, some sticky page flags, loose notepaper, stamps, sticky notes etc.  the zip pocket is wrapped around a notebook which holds all of my more permanent reference lists and information.


The second elastic contains a folder with frequently used stickers, and some papers from my Filofax that I haven't completely transferred over yet.  This folder surrounds my calendar.  I stitched together a book that uses an undated week on one page + notes (from PembrokePapers on Etsy) with my DIYFish weekly chart tipped in.


The third elastic houses my bullet journal, which is a Midori grid notebook cut down to the personal size.  I'm new to bullet journaling, but thought this would be a great time to start using one.  I can put in daily notes and anything relevant to my health and diabetes management.  So we'll see how this goes!


The last elastic is for my tracking section.  I have a yearly chart (from DIYFish) that I use to track workouts, medical things, travel, paid time off from work, and products that I want to track to see how often I'm ordering.


For a closer look at my set up, be sure to check out my (very first) YouTube video!

Happy Planning!  I can't wait to see what everyone else does with this challenge this year.  I'm hoping to see lots of new planner posts,  pictures, and videos :).

Friday, July 25, 2014

Filofax Flex Setup for Work


I can't believe I've been using my flex for work with the same setup for about five months!  The system is working really well for me, but I'm getting antsy to change my setup.  So I decided I would share my current setup first.


I'm using the Filofax A5 Leather Flex Lizard Print in the color blackcurrant.  When the binder is closed I wrap a Martha Stewart fabric elastic band around it.  I've traveled with it this way several times  and it keeps everything nice and secure.


I have three notebooks in the Flex...


  • Franklin Covey Compass Weekly Classic - This is 8.5" x 5.5", so I had to trim the back cover slightly for it to fit in the flex.  I need to be able to report my time, by project, each week.  So I track my time throughout the day, then highlight time spent on each project with a different color.  It makes it very easy to report hours at the end of each week.  It also has a month on two page calendar where I track business travel, deadlines, project deployments, and paid time off. There is a monthly task list where I track accomplishments for the month.
  • I use an A5 notebook for random jots and to take notes during meetings.  I use lots of sticky flags to mark projects or important notes.  After I finish a notebook, I archive the pages in a Staples mini binder.   That way I can always go back and find any notes, if I need to, without having a ton of notebooks hanging around.  I go through a notebook about every 2-3 months. Important meetings and notes get typed up and stored electronically.
  • Lastly I'm using a Filofax Flex A5 Thin Ruled Notebook to track my To Dos. It's a very similar system to what I wrote about here


I also have a Flex pen loop that holds my new favorite pen, the Pentel EnerGel Pearl Needle Tip (0.5) with black liquid gel ink.


Thanks for Reading,
Tonya

Follow me on Bloglovin'
Follow me on Instagram


Tuesday, October 15, 2013

Mulling Over My 2014 Setup Options

I can't decide what I want to do for my setup for 2014 - the problem is I have way too many awesome binders that I want to use!  I've purchased a few more since my last collection post.


I have an A5 Ochre Malden - I was using this as my work binder, but switched to an A5 Osterley in Grey.  I thought the Osterley had a more polished professional look than the Malden.  I think the Malden is rugged and timeless, perfect for to hold all of my reference information.  So that one just needs to be set up.  


I have a new (to me) Franklin Covey classic binder.  I think it is the Her Point of View binder in black from around 2007.  It is full grain leather, the most buttery soft leather I have ever felt, seriously.  I want to use this for everything.  I bought it for work because I live in the US and it is so hard to find A5 paper and binders - especially with Filofax hole spacing (and I'm way too Type A to re-punch if I can see the 'wrong' holes)!  So I have all my meeting notes in the A5 and I don't have a good way to archive them.  I don't really want to spend at least $50 on an A5 binder to use just to store old meeting notes.  I do reference my old notes occasionally, so I like to keep them and be able to leaf through them.  Anyway, the FC classic size fits 5.5 x 8.5" paper and has common hole spacing to other US binders and planners - and has 1.25" rings!

Here's what I'm contemplating for 2014 setup:
  1. Moving from my personal size up to A5 size, and using the grey Osterley as my personal binder.  Using the FC classic as my work binder.  This would be costly, since I have all of my 2014 calendars, papers, etc. for the personal size and I'd have to re-buy for the A5.  I like the idea because I would be able to fit more pages into my binder.  I work from home, so I don't really have to lug around my planner too often.
  2. Move into the FC Classic for personal and work - can I be a one life one planner kind of girl?  This leaves me without using a Filo as my main planner,  and I love my Filofaxes (Filofaxi?)
  3. Stay in the personal size for my main personal Filo, and move to FC classic for work.
  4. Scrap the whole idea of moving - stay in the personal size for main personal Filo, and stay in A5 Osterley in Grey for work.  If so, I need to find a use for my FC classic - it's just to amazing to sit around unused.

So what do you think I should do?  Please let me know in the comments, your input is greatly appreciated!

~ Tonya

Follow me on Bloglovin'
Find me on Instagram:   http://instagram.com/prettylittlepocket

Monday, August 19, 2013

Time for a change

I decided to switch out my main Filofax from the plum to the orange Osterley.  I tweaked the setup a bit as well.


I was in the mood for something bright, so I made new dividers and tabs, rearranged some sections, and added a new health section.  This is where I keep notes related to doctor appointments, and a daily logbook for tracking exercise, water intake, blood glucose readings, and general health info.  I keep one month of pages behind this tab and then archive them to my health and fitness Filofax.

I also brought back my notes section.  I had moved it out into a notebook that I kept tucked into the front pocket, but by moving the section to the middle of the filo, I don't have any problems with hitting the rings while writing.

I took out the brown today ruler and use a ribbon paperclip to mark my spot instead.


One of the biggest changes was adding side tabs into the mix.  I normally hate side tabs because these get crushed by the pen loops, but these are no ordinary side tabs.  They are actually page markers I made that use a clear fly leaf that can be taken out and moved as needed to hold my spot (like the today ruler).


The last tweak I made was to remove the month section and add the horizontal year planner back in.  I never used it because I hated having to open the rings to take it out and write on it.  So I made it removable by reinforcing the holes with washi tape and clear hole reinforcers, and then slitting the holes.  Easy.  Now I can take it out, write on it, and pop it back in without opening the rings.


This is one fat Filofax, but I love it!

~Tonya


Follow on Bloglovin

Instagram

Thursday, August 1, 2013

A5 Ochre Malden - Set Up and Ready for Work

Once upon a time, I used a bunch of notebooks to keep track of my work things.  One notebook for meeting notes, another notebook for tasks, Outlook for my calendar, and lots of file folders for printed out paper for various projects.  I thought maybe, just maybe, I could use a Filofax to organize it all.

So I went on the hunt for a new binder.  I knew it would need to be an A5, I wanted one that would lay flat, look professional, and only get better with age, even after lots of daily use.  So I set my heart upon the elusive A5 Ochre Malden.  I found one on the Filofax UK site and had to pay a hefty sum to get it shipped across the pond to the US.  It will be worth I said to myself, I will love it, and I will use it forever, and it will make me so much more organized.  So I tendered the money, and waited.

It finally landed on my doorstep and I went to work setting it up.  It came out of the box with a couple of scratches on it.  I don't mind - I like that it makes the binder more rugged and loved looking.  I expect it will get scratched and abused much more over time.

IMG_5350

I made the front cover using a picture of a Tiffany charm bracelet (something I'm coveting at the moment) printed out on cardstock paper and overlaid with velum (to soften the look) and a sticker that says 'Sparkle' because I need to remind myself to sparkle at work!
IMG_5352

I also made my own dividers.  I used an aqua paisley paper on the front, shocking pink polka dot paper on the back for an unexpected pop of color, and some washi tape.  Rather than laminating the dividers, I used Mod Podge.  I love this stuff.  Laminated pages seem too stiff to me, but the mod-podged (is that a word?) pages are flexible and strong at the same time.  Plus I used the glossy finish, so they have a nice sheen to them.  I use the back side of the divider as a dashboard for the section when needed.  I decided to use the girl of all work business tabs, and it came with twelve sections.  I think it's overkill, but for some reason I decided to use them all anyway.

IMG_5355

Meetings Section - I deconstructed a Rhodia meeting book notebook for my meeting notes.  I have almost a full notebook in here.  Once I get through these pages I'll need to archive.  I use a small oli clip to mark my place.

Deadlines Section - I use the JEN Action planner for my to do list.  The pages are slightly larger than A5 so I had to cut them to size and punch them to fit. I've used these pages and my own interpretation of the autofocus list system for a very long time and it just works for me.   I'm planning a separate post for how I manage my task list. (Sorry, had to pixelate out the list since this is for work).

IMG_5328

Schedule Section -  I do have the week on two pages schedule, which I am experimenting with using.  Since I use Outlook for meetings, I am using the Filofax pages to track my time, and note my three most important tasks for the day.  Not sure if I'll keep up with this, but trying it out.


My other sections are:
Projects - I print out information that I need to refer to frequently for projects

Notes - stores important reference information not related to a specific project

Upcoming - things I need to put on the agenda for upcoming meetings

Outgoing -  really doesn't match the tab name, but I use this to track things I'm waiting on from other poeple

Travel - holds itinerary, travel rewards club information - pretty much anything related to work travel

Expenses - so far section is empty, but will hold receipts and expense report info for business travel

Urgent - holds information related to career development (Because it's urgent that I keep up to date on this, right?)

To Do - long term to do items whenever I have some downtime

Contacts - Frequently used company numbers, company locations

I have a scratch pad at the back where I can jot down information as needed.

So that's the setup for now :)


Wednesday, July 10, 2013

Mind Mapping Your Planner Setup

When I'm trying to set up a new planner, or i just have lots of ideas for changing my current setup, I find it best to get all those thoughts running around in my head out onto paper. I really like using a mind map for this. I just draw a bubble of the main idea in the middle of the page and let the ideas flow. Usually categories of ideas will present themselves, and these end up being my new sections or tabs in my planner. From there I can also get a sense of what types of paper or accessories I'll need, and even the size of binder that would work best. If there are just too many categories, or one category that has a lot of ideas or subcategories, I know I'll need to break this out into a separate binder (yeah, a reason I need another Filofax!).


Here are some examples of Filofax setup Mind Maps I've done in the past.


This same concept works well for project planning too!


Have you ever used Mind Mapping to set up a new planner or binder?